Sales funnels are theoretical or visual journeys of your customers — from awareness to conversion. And ClickFunnels is one of the best funnel builder for creating high-converting sales funnels.
You might be asking: “Why can’t my website act as a sales funnel?” Sure, most businesses do use their own websites. But in this blog, you’ll learn why you should use ClickFunnels instead.
In this ClickFunnels tutorial for beginners, you’ll learn to create your first sales funnel that will generate massive revenues. You’ll also get a copy of the $5M+ revenue-generating funnel that Ravi – our founder – has created for his online business model.
Why do you want this?
Because he knows what he’s talking about – Ravi got an award from the ClickFunnels company for making a funnel that generated over a million in revenue!
If you want to learn how to use ClickFunnels in the most strategic way for consistent income generation, read on.
What Is ClickFunnels?
ClickFunnels is a popular software that allows you to create a sales journey for your prospective customers. It’s a versatile platform that provides the tools to make websites, landing pages, opt-in pages, webinars, and more. There are templated pre-made designs for simple usage, as well as customizable options.
Businesses use ClickFunnels to market their services and products, get leads, and make sales. It automates the customer’s purchasing journey, which saves entrepreneurs time and energy.
At a glance, with ClickFunnels, you can use:
- Web hosting
- Page builders
- Full content management system
- Email autoresponder
- Detailed analytics
- Shopping cart
- And more
The details analytics tool is one of the most valuable functions of ClickFunnels, because you can track visitors, click-throughs, opt-ins, and conversions. That helps businesses to manage their campaigns and optimize them for the best chance of success.
Why Does ClickFunnels Work So Well?
When we contrast it to a simple website, a prospect can exit from your landing page from several exit points. They may click on About, Blog, Services, or Contact links on the menu.
However, when you land them on a dedicated sales funnel, they only have two options: exit or give in the details.
Mathematically speaking, the probability of conversion increases to 50%.
ClickFunnels is a feature-rich tool where you can do several things to optimize your customer journeys. However, there’s one BIG problem.
You might find it overwhelming if you’re a beginner. Learning how to use ClickFunnels to its full potential is necessary. That’s why we’ve created this step-by-step ClickFunnels tutorial.
Let’s Start With the ClickFunnels Dashboard
Let’s imagine you’ve already signed up for ClickFunnels (it comes with a 14-day trial and has multiple paid plan options). The first thing that you see is the ClickFunnels dashboard.
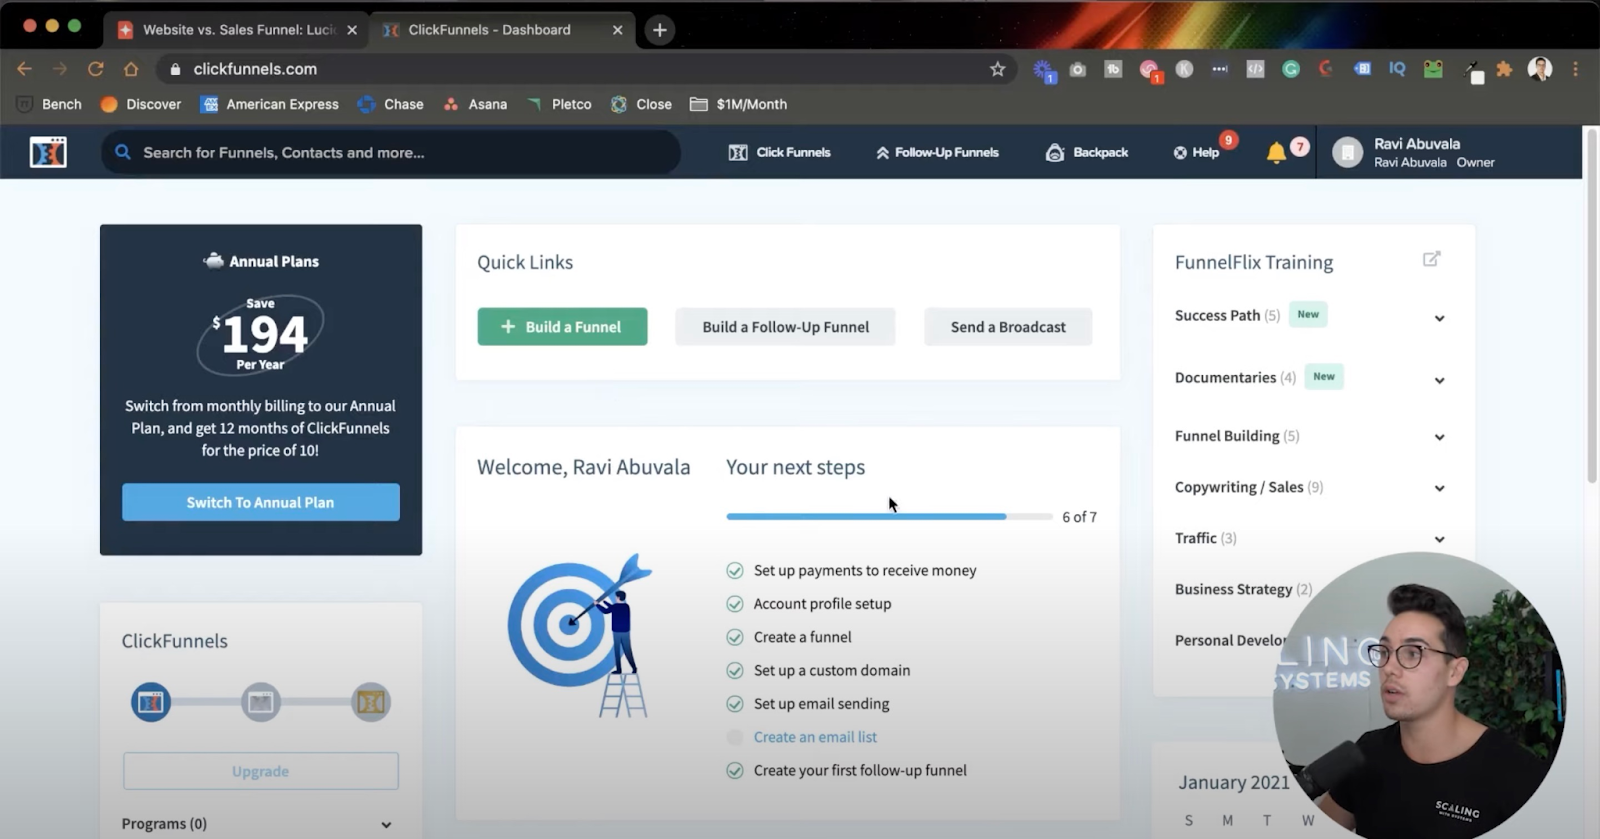
On the top bar of this dashboard, you’ll see options like ClickFunnels, Follow-up Funnels, Help, and Your Account Name. We’ll get to the intricacies in a minute, but first, let’s set up this dashboard for you.
ClickFunnels Account Settings
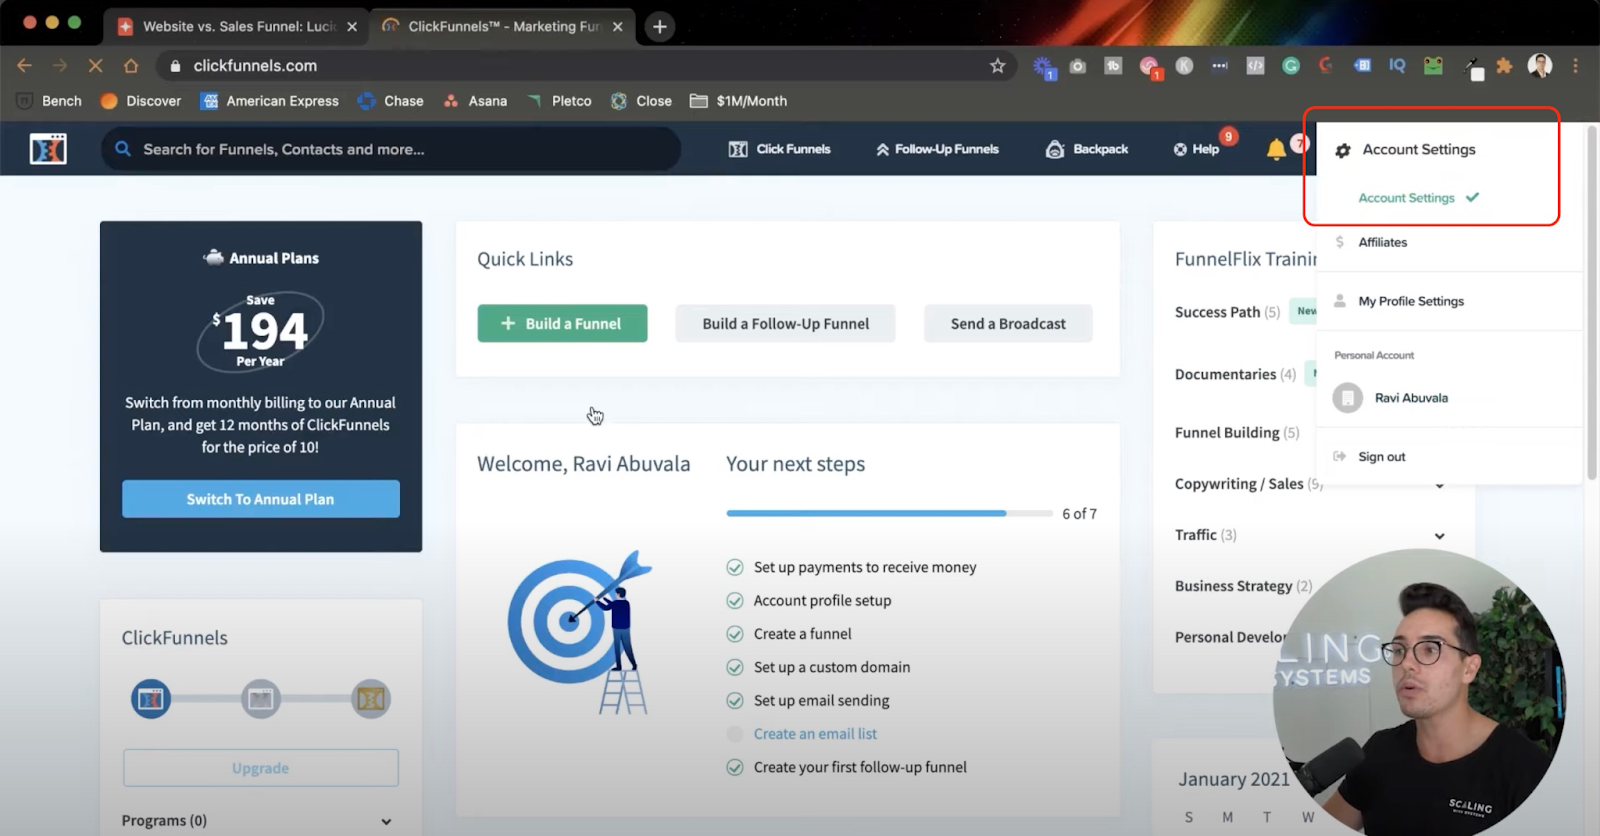
Head to the top right corner of the dashboard, click Your Account Name and then Account Settings. See the following screenshot:
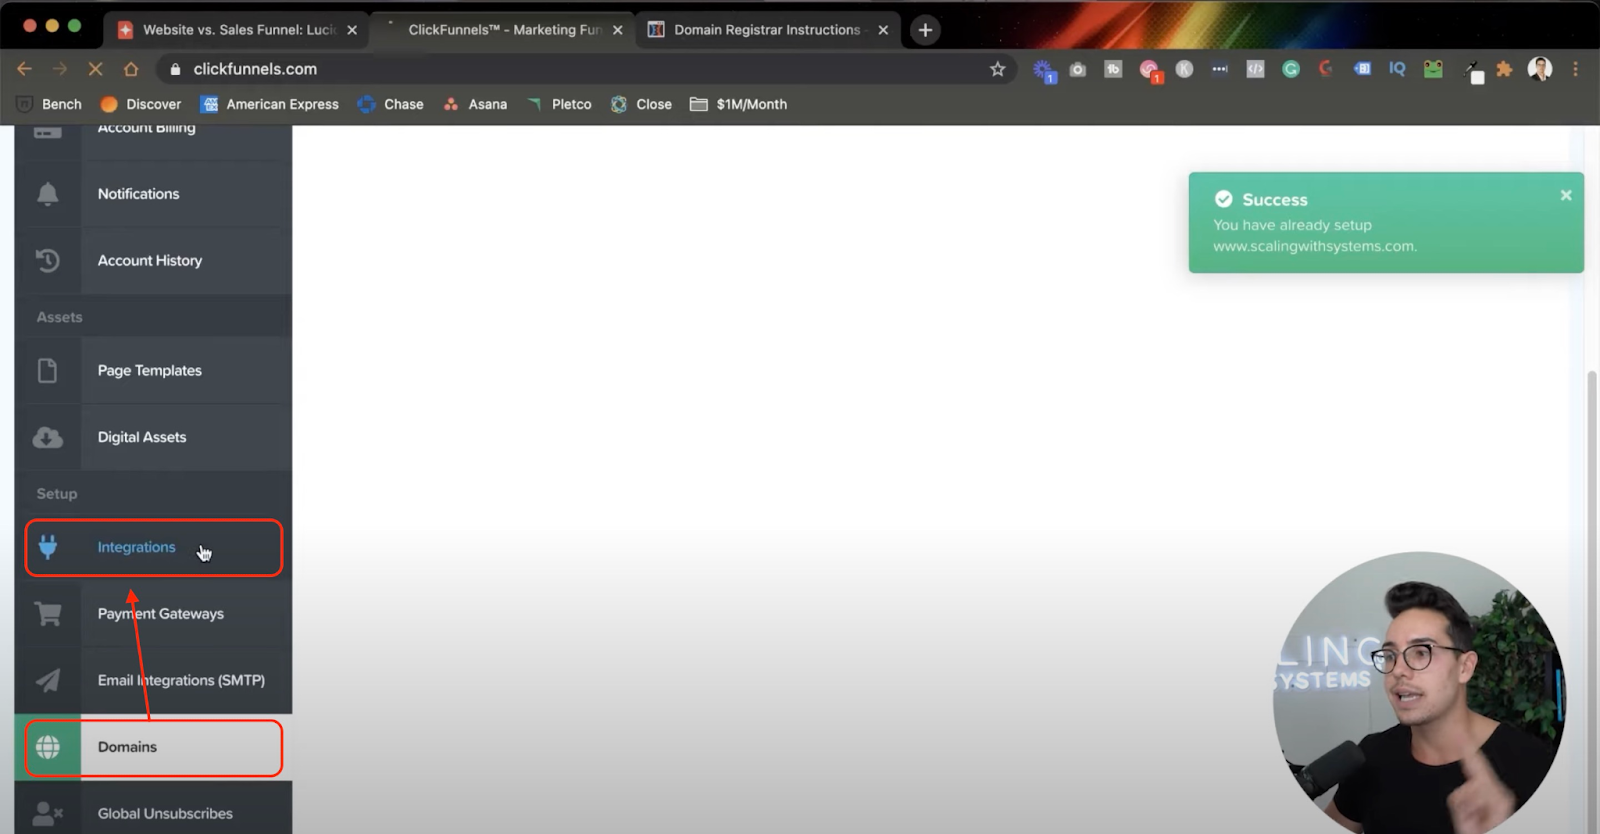
The first thing you will do is connect your domain(s). So on the next page that appears, scroll down, find “Domains” on the left sidebar, and click on it.
This part is important.
Here’s an example of your sales funnel URL with your domain connected vs. not connected.
- Domain Connected: https://raviabuvala.com/real-estate-training
- Domain Not Connected: https://raviabuvala.clickfunnels.com/real-estate-training
Which one looks more professional?
It’s simple to connect any domain, and ClickFunnels has helpful solutions for connecting domains in case your registrar isn’t supported, or you face difficulties.
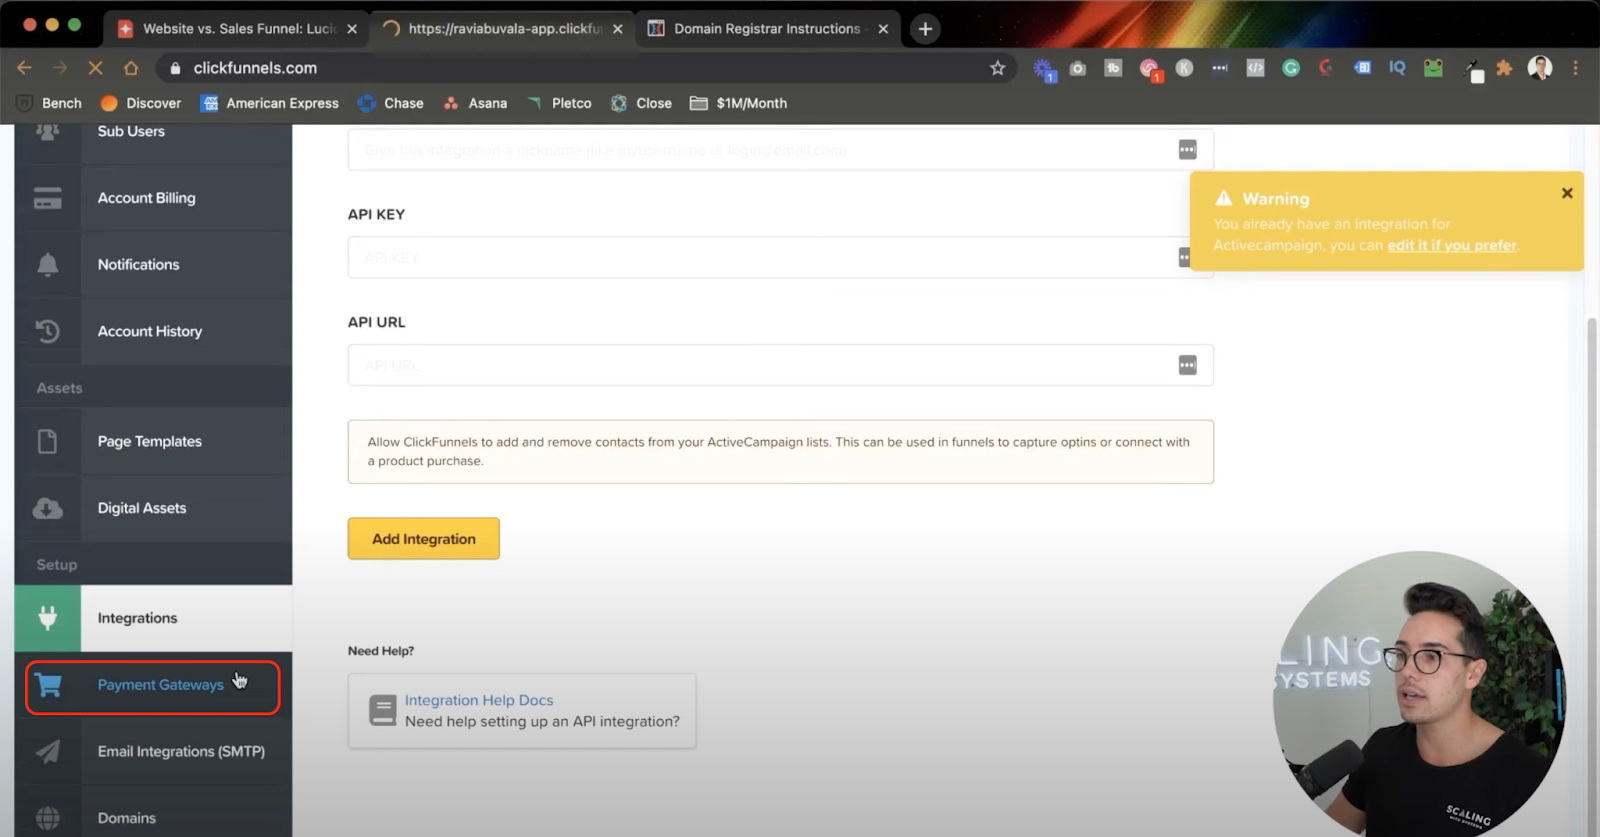
ClickFunnels Integrations
The next thing is to have integrations in place. After connecting your domains, look for the option “Integrations” on the same left sidebar.
You can connect your CRM, email marketing tool, and other apps on this tab.
Integrations are essential because most prospects don’t even make it to the “Thank you” page and leave midway. With the Integrations setup, you can remarket them and capture those warm leads.
For instance, suppose someone opted in but didn’t book a consultation call with you. With remarketing, you can send prospects a mail and bring them to the booking page again.
Some of the apps that ClickFunnels support are:
- ConvertKit
- ActiveCampaign
- Mailchimp
- GoToWebinar
- HubSpot
- Kajabi
- Salesforce
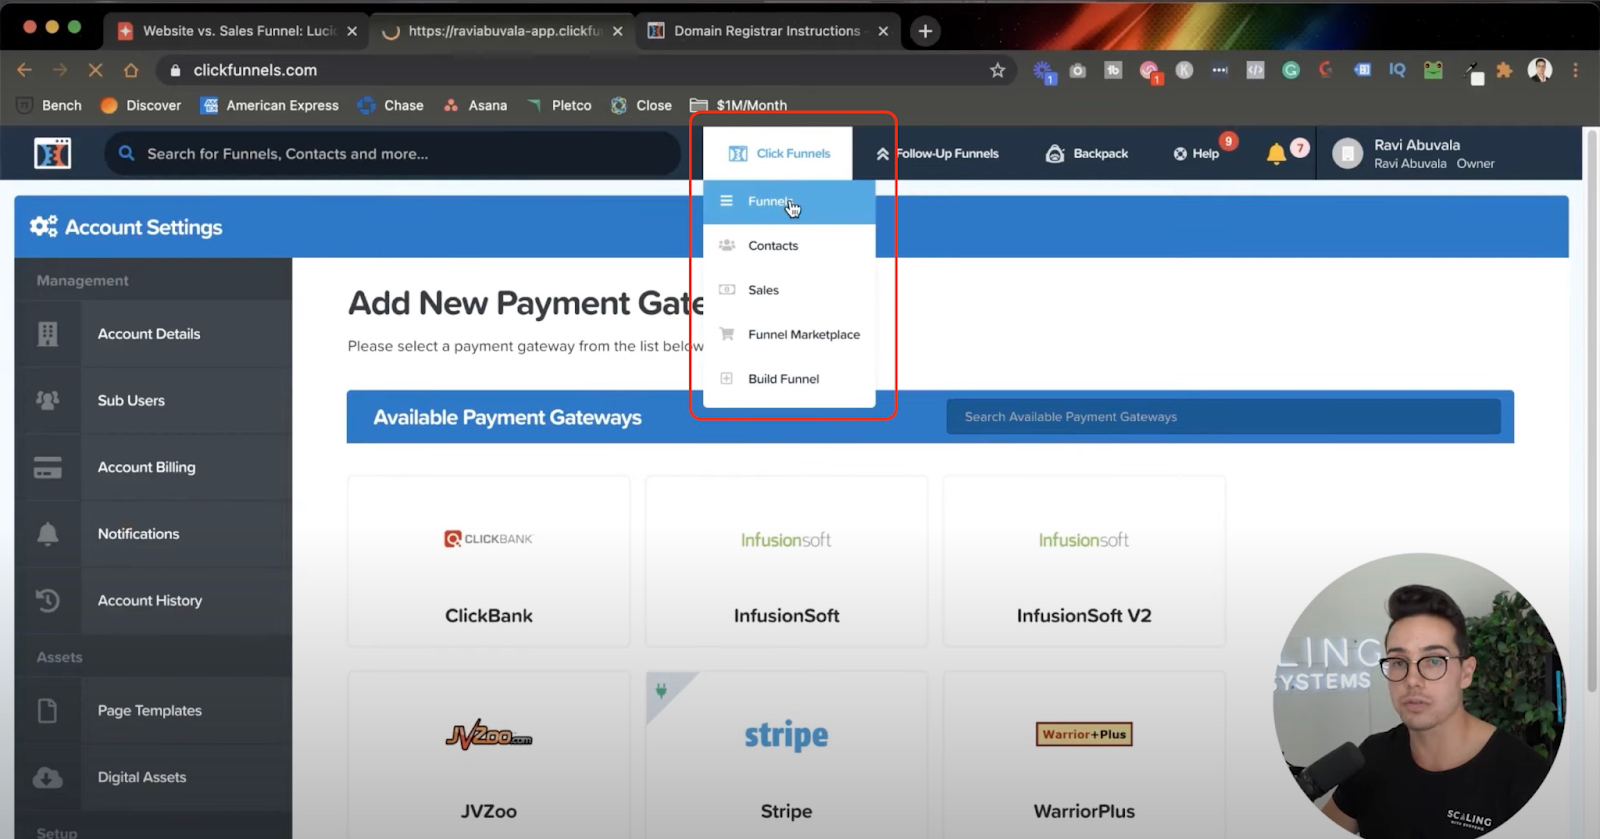
Manage Payment Gateway
Now, this setting is self-explanatory and an optional one. It does what it says — allows you to add a payment gateway such as Stripe and PayPal.
You collect payment from the people that are going through your marketing funnel. Further, if the amount is less than $2,000, you can most likely collect payments directly on your sales funnel.
Collecting Emails Inside ClickFunnels
After setting up the crucial settings, it’s time to build sales funnels. And you’ll learn exactly how to do that in this ClickFunnels tutorial.
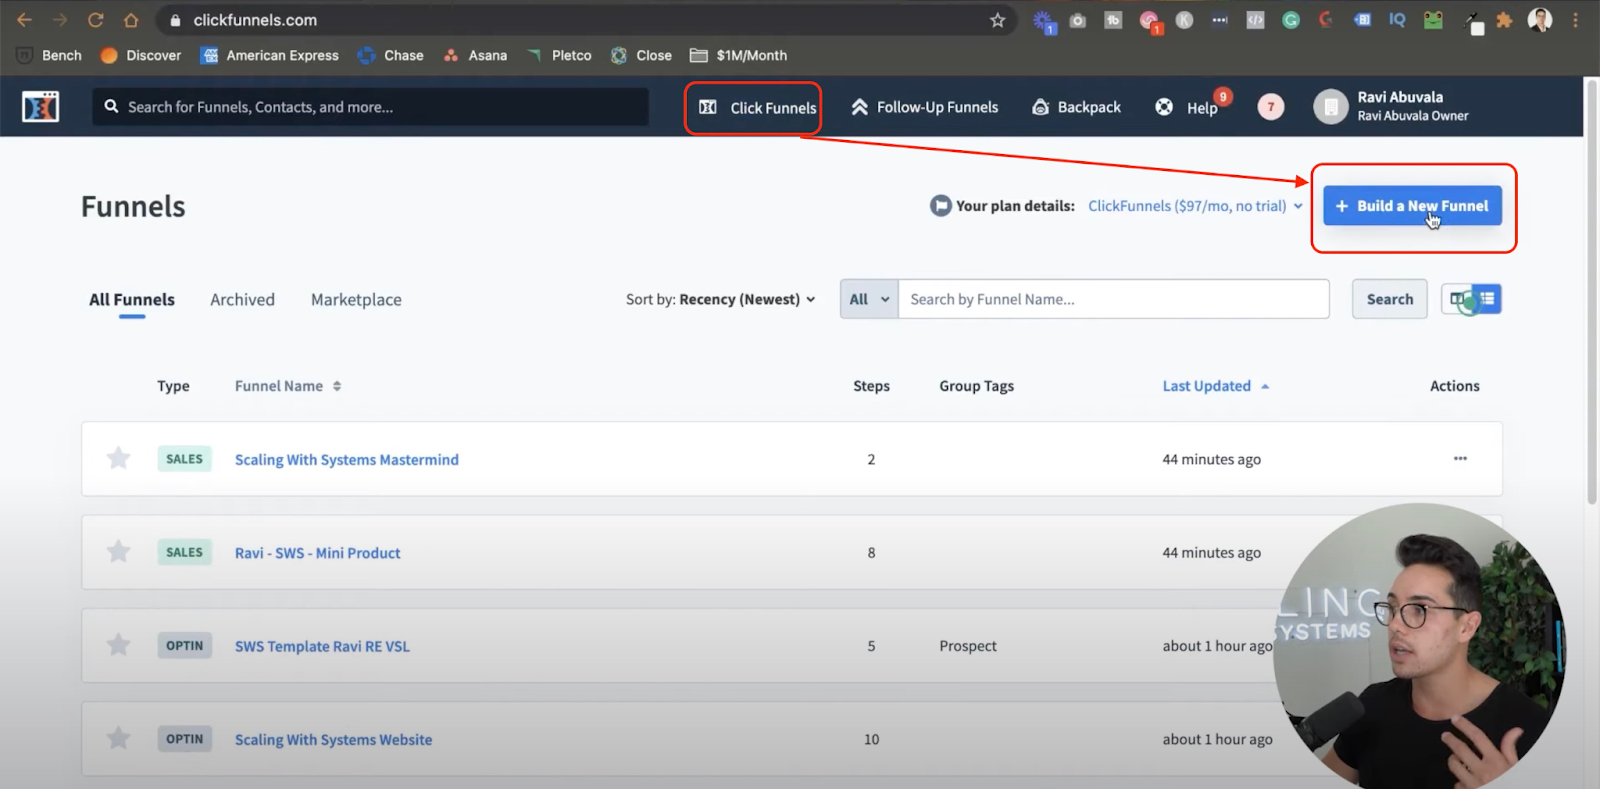
Hover your mouse over the top bar and click on the “Funnels” option in the dropdown menu.
You’ll be redirected to a page where all your sales funnels live. You can see in the screenshot below that Ravi has a few sales funnels already created and running.
Let’s show you how you do it from scratch.
On this page, click the big blue button that says “Build a New Funnel.”
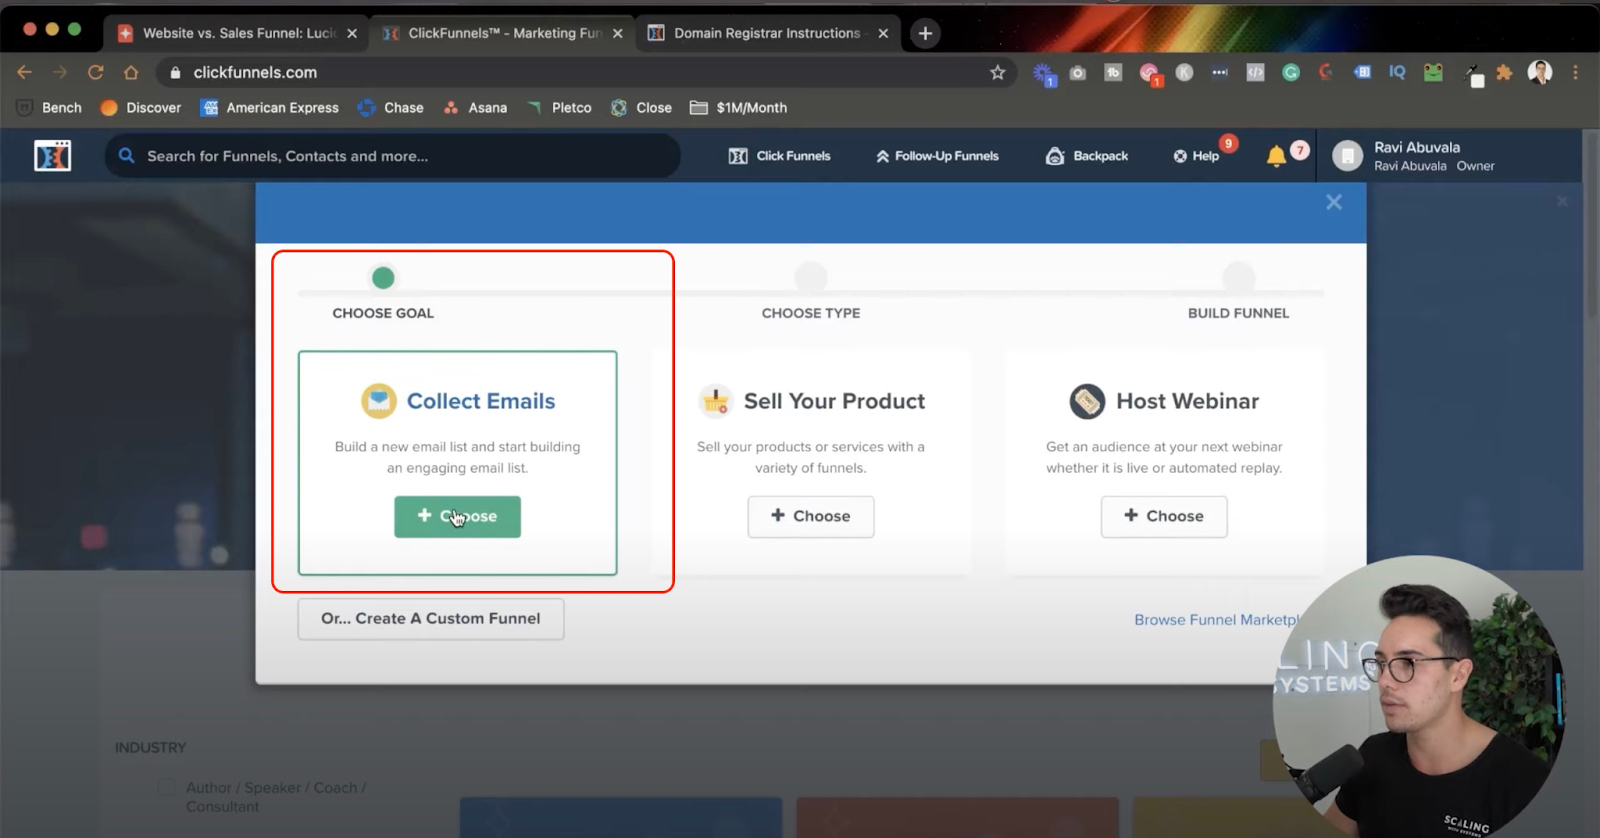
A new window will pop up on the screen. And this is one of the most incredible things ClickFunnels does. It’ll ask you to choose your funnel based on your goal and give you a walkthrough.
Additionally, you can also create a custom funnel. But for most people reading this article, letting ClickFunnels guide you would be a better option.
Choose which type of marketing funnel it is going to be. For the sake of this ClickFunnel tutorial for beginners, we’ll select our goal as “collect emails.”
On the next page, ClickFunnels will ask you to name the funnel. Click the “Build Funnel” button after naming, and it’ll load a bunch of templates on the next page for the opt-in page.
Let us break it for you if you don’t know what an opt-in page is.
An opt-in page is where your prospects will enter their details. ClickFunnels asks you to choose how you’d want it to look.
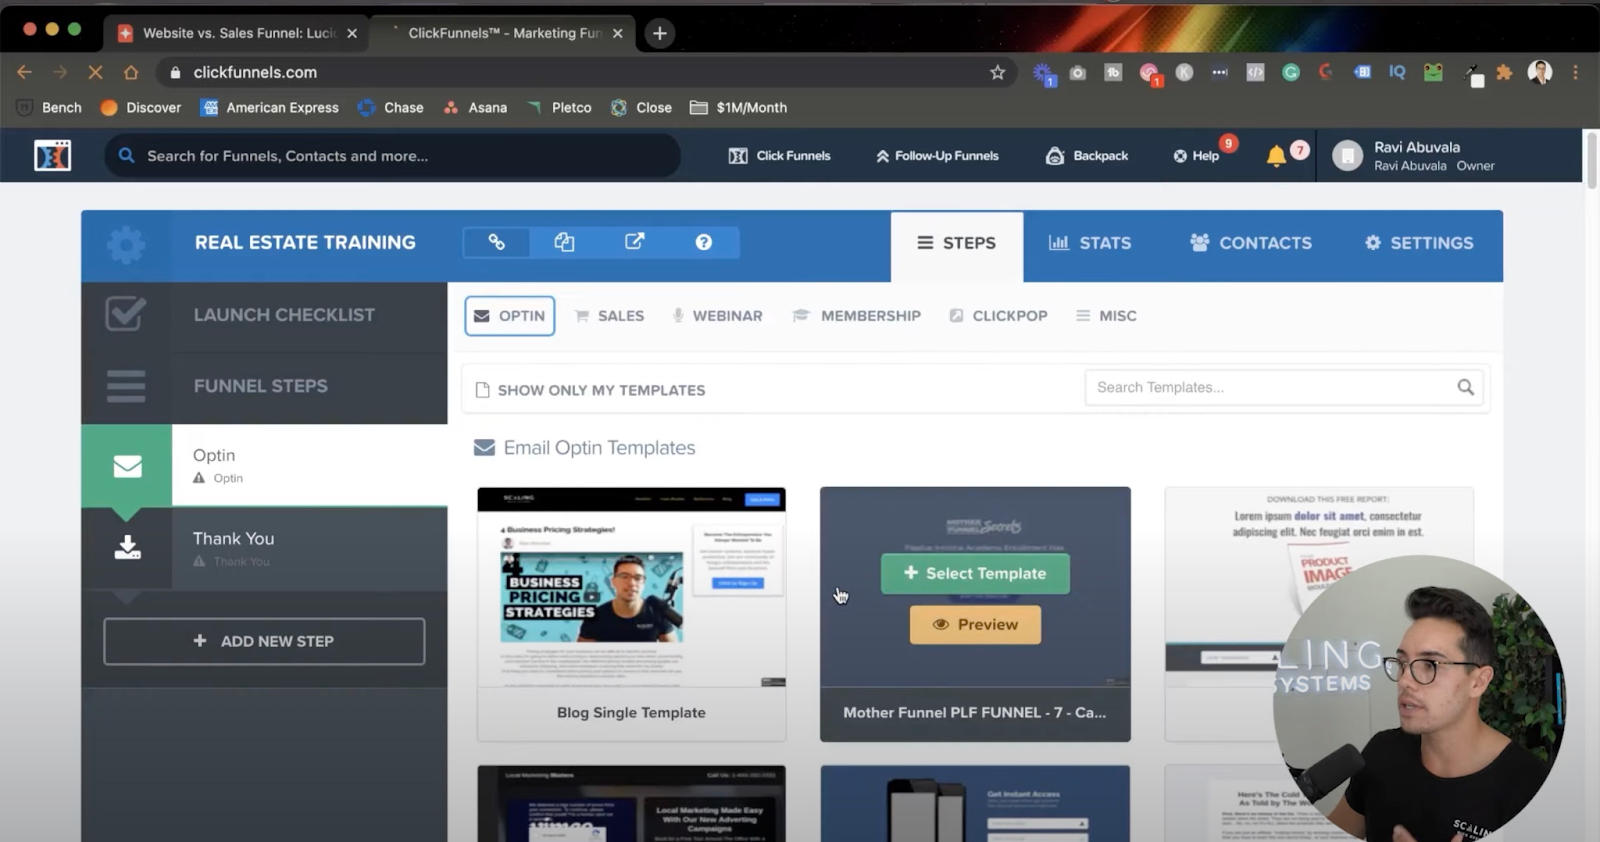
There are hundreds of templates ready-made for the opt-in page. But here’s a little theory: the uglier the landing page looks, the better it converts. It is well-known in the business world. Ironically, you don’t need to create pretty pages to bring more conversions.
On this page, you’ll also see a sidebar showing the steps that will be inside your marketing funnel. Further, on top, you’ll see several tabs — click on the Settings tab.
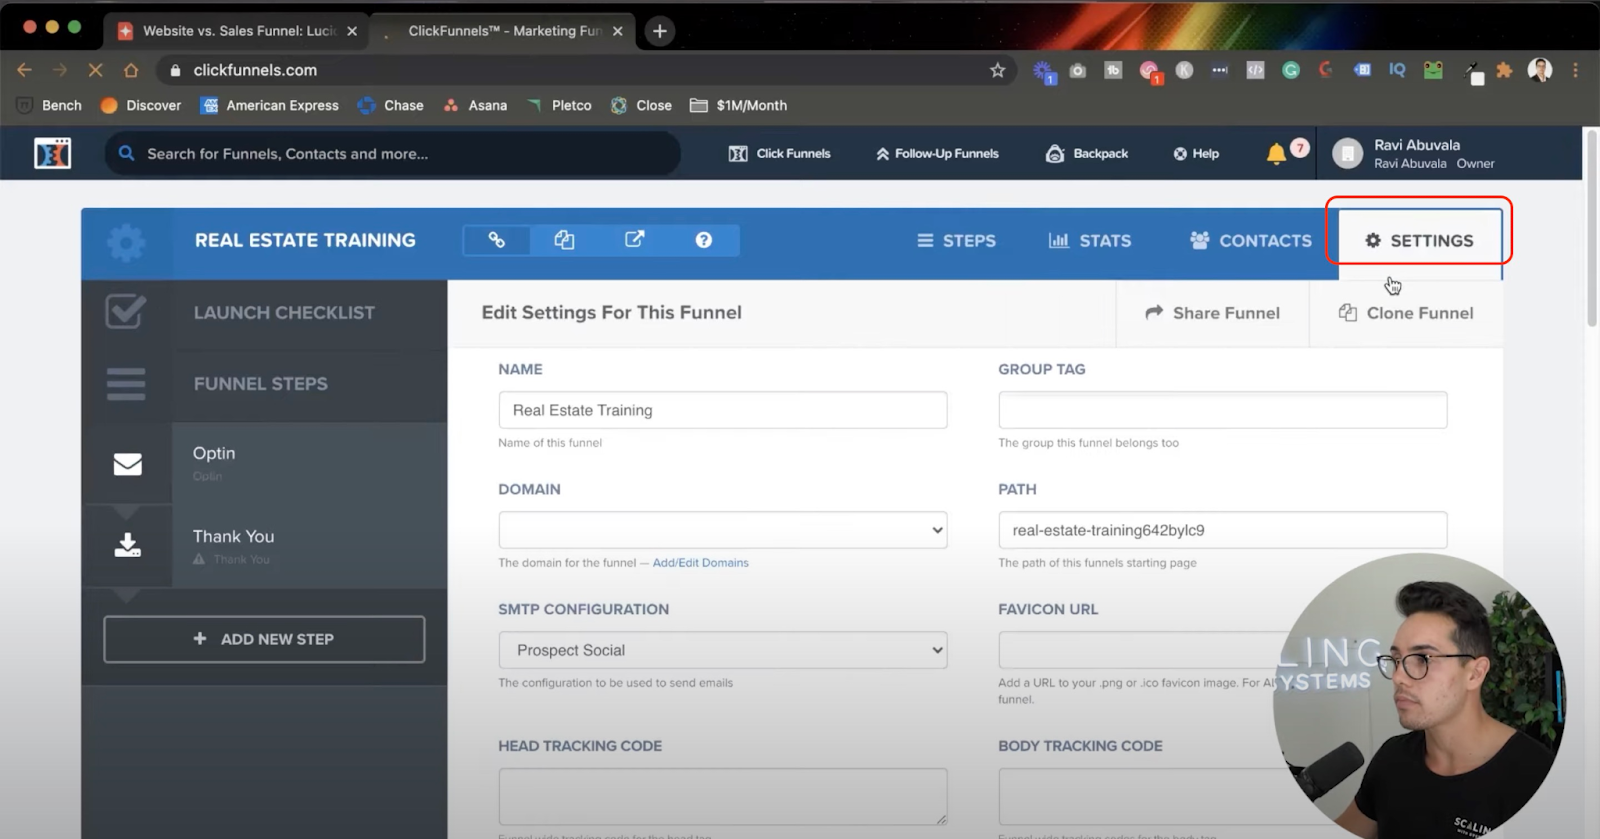
Now ClickFunnels will open a window where you can set the domain on which your new sales funnel will be and a bunch of other settings.
Domain, Path, and Favicon
On this new sub-window, set the Domain as the one you want. Next, edit the path to a more tidy one. Note that this path will only be the URL of the first page of your sales funnel.
Further down below, you see a textbox to enter the Favicon URL. Now favicons are small images that you see on the top of the browser window. See the following pic for clarification:
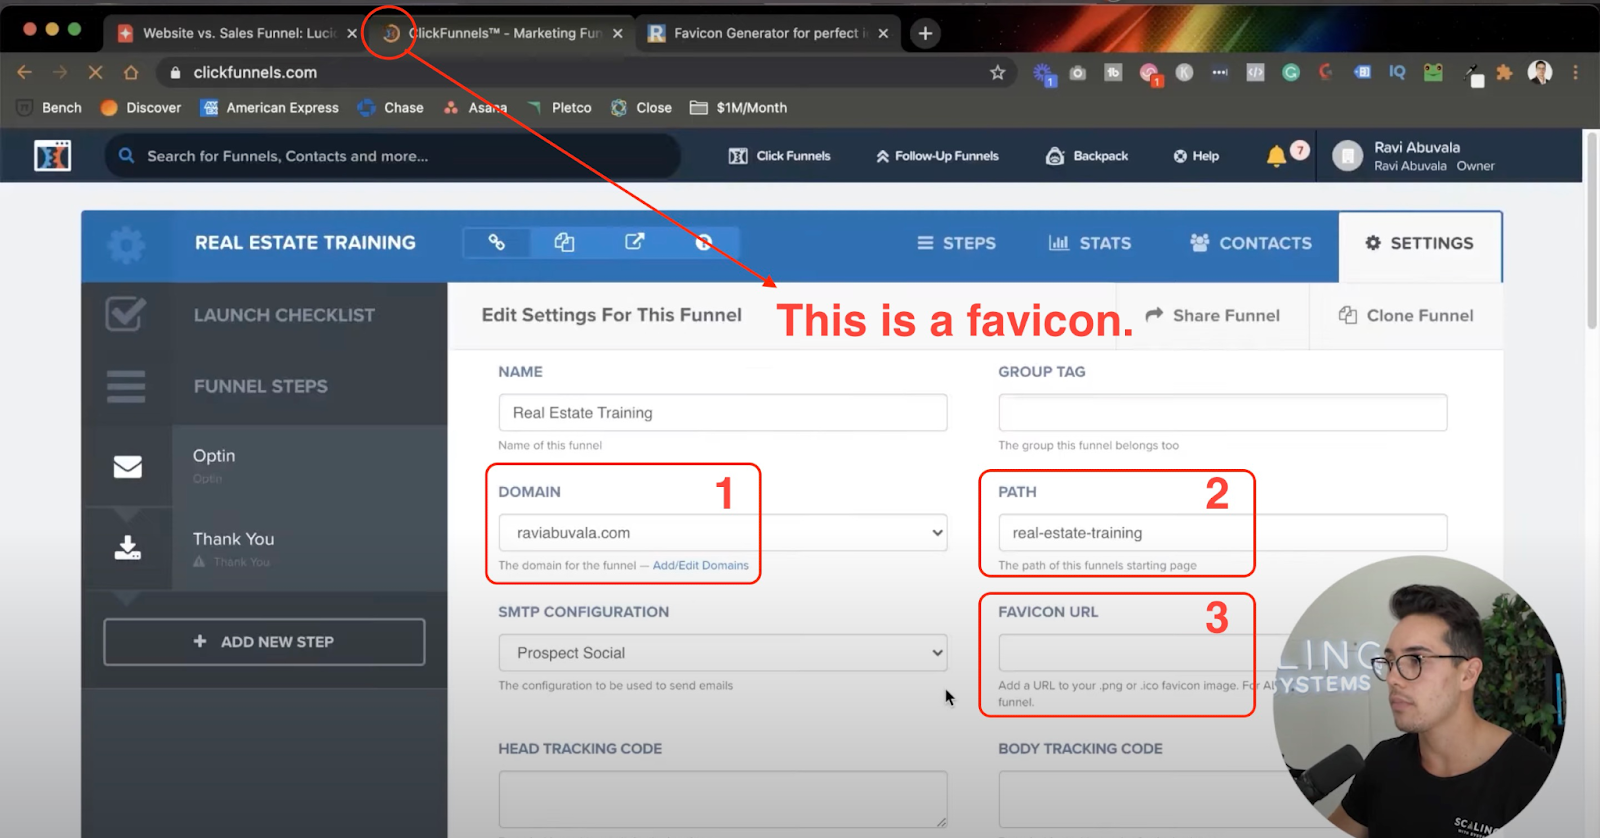
If your website has a favicon, fantastic. Simply get its URL and paste it here. However, if you’ve to create a new favicon, you can use a favicon generator to create a favicon from any image, preferably your logo.
Examining Stats
Next to the Settings on top, you’ll find the Stats tab — click on it. Here are a few vital stats that you should know and keep track of for your sales funnels.
On this sub-window, you’ll know how your marketing funnel is converting. ClickFunnels breaks down the stats based on the number of pages you have in your sales funnels.
For example, as you can see in the image below, you have two stats — one for the opt-in page and one for the Thank You page, which is the last page of this funnel.
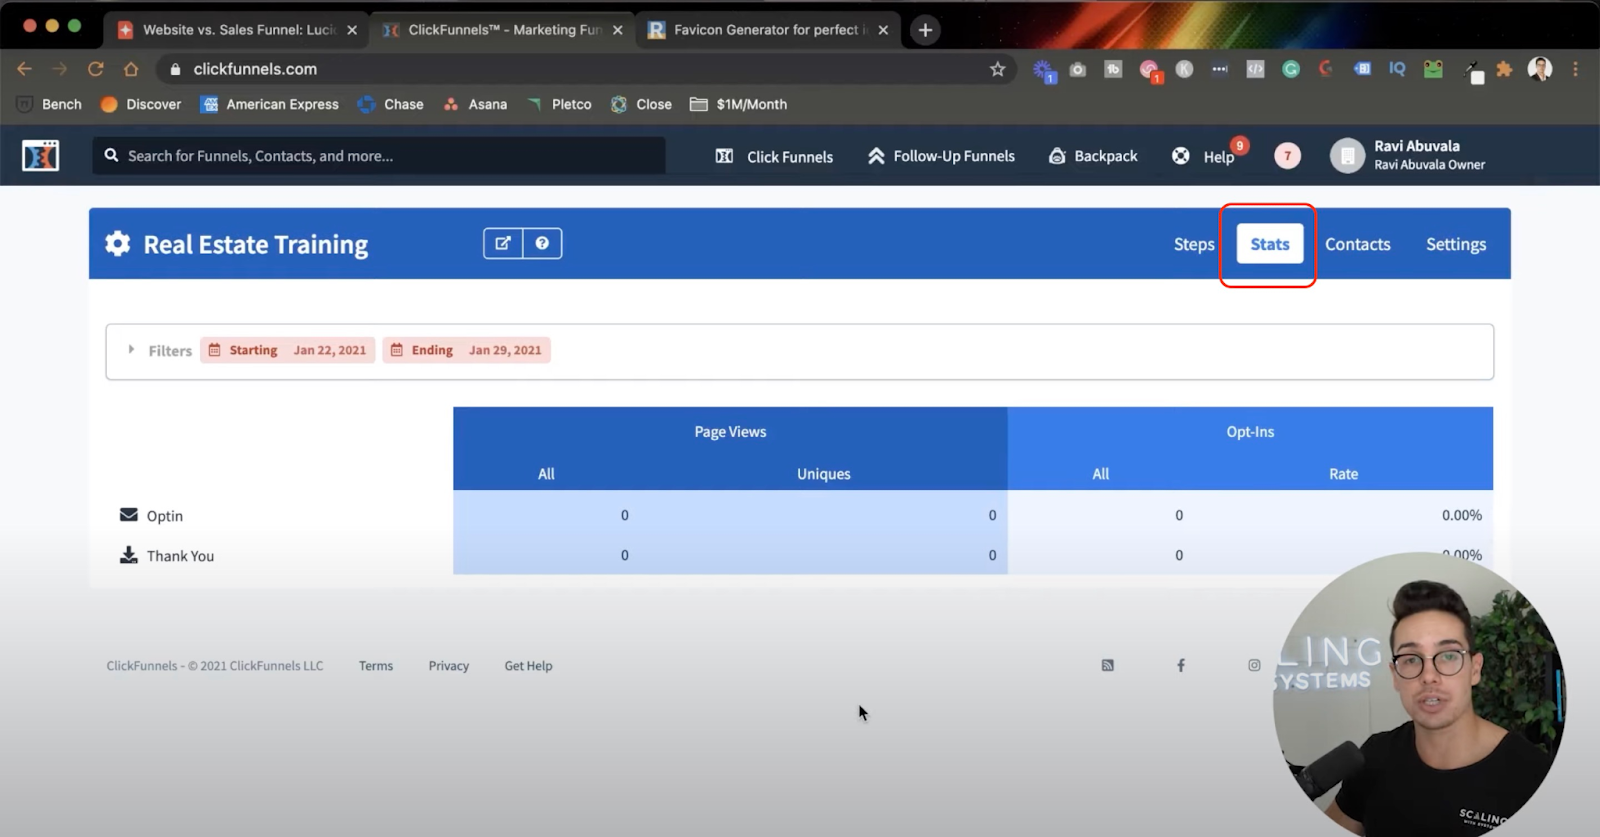
Suppose ten people (unique) landed on the opt-in page, and only one (unique) reached out to the Thank You page. It means your conversion rate is 10%.
Contacts and Page URLs
The Contact tab is next to the Stats. All the emails you’ll be collecting on this tab get listed here.
But you don’t want your emails to be listed here if you have already integrated your email marketing tool. This way, your emails go directly to your CRM and email marketing tool and get funneled up further.
You’ll learn how to do that on this ClickFunnels user guide; read on.
Next, click on the Steps tab to set up different URLs. Now here’s what you need to understand about URLs:
Funnel URL: This is the URL of the first step of the funnel.
Steps URL (for example, opt-in step): This URL is for a particular step.
Pages URL (required when you split test): This URL is for a particular step when you do split testing. In other words, opt-in step version A and opt-in step version B can have two different page URLs.
ClickFunnels Editor
The ClickFunnels editor is easy to use. You don’t have to be a techie to create fully functional pages.
To enter the ClickFunnels editor, click on the Edit Page button. The next page will present options to help you edit and optimize your funnel page.

SEO Metadata and Settings
The first you’d want to do is to ensure everything is set up correctly. Click the Settings > Integrations button on the top bar.
Here you can select what integration should be used for this particular page. For example, if you’re collecting email addresses, you can choose which email list your new leads should go to.
After completing the integration setup, click on Settings > SEO Meta Data.
A lot of other ClickFunnels tutorials for beginners miss out on the SEO aspect of the platform, so listen up; SEO metadata will ensure that your page looks tidy on Google’s search engine results pages (SERPs) or if someone shares the link on socials.
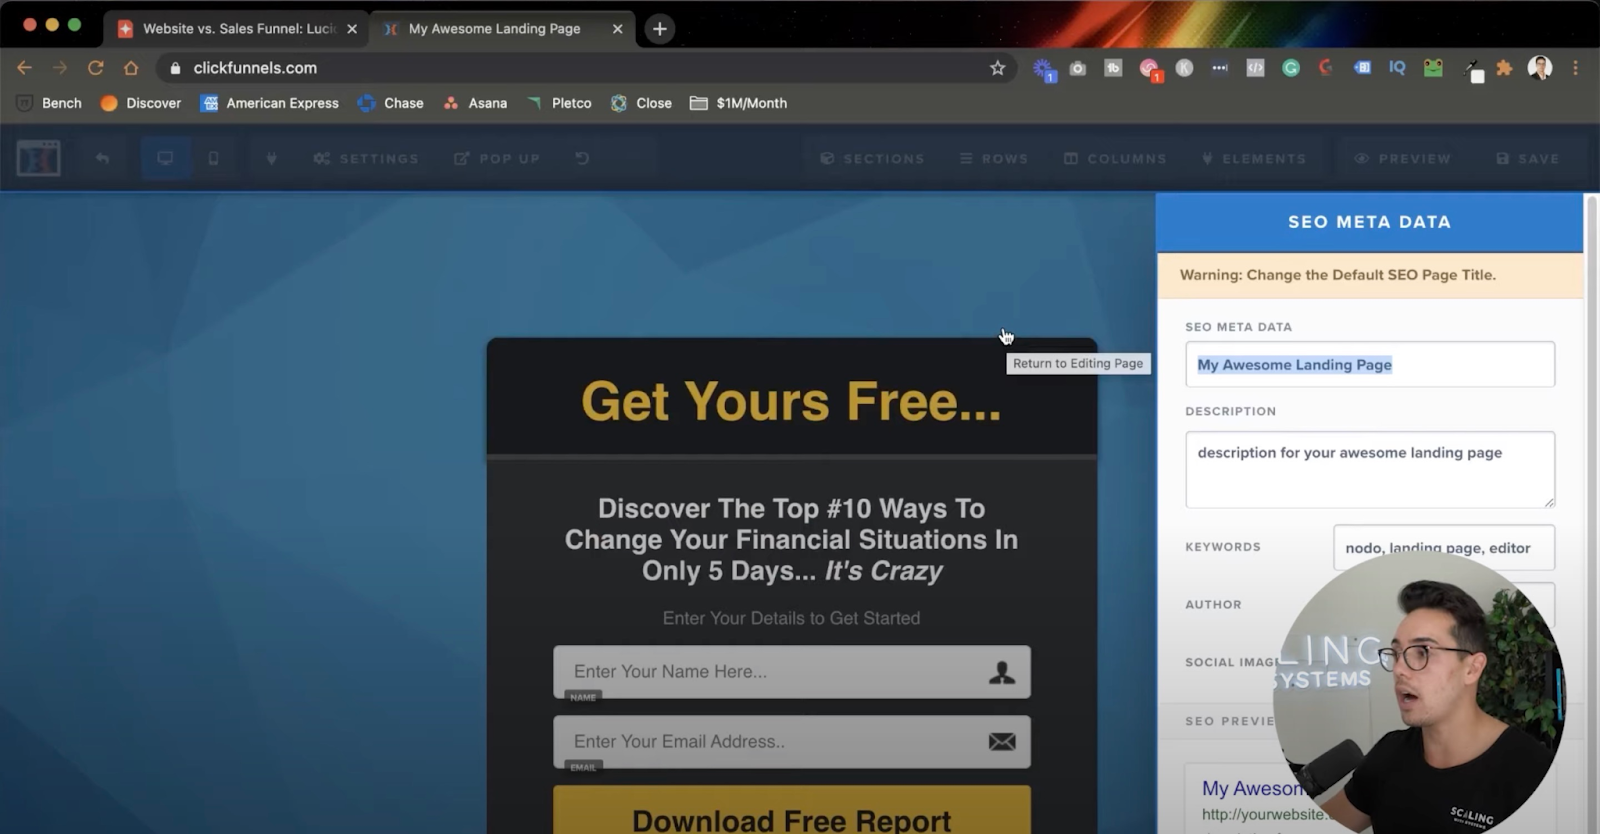
On this window, you can set up an SEO title, meta description, targeted keywords, author name, and social image for the page. Click the Save button on the top right bar after filling in the details.
General Settings: ClickFunnels Tutorial
Coming back to Settings > Tracking code. On this window, you can add a tracking code (for example, Facebook pixel code) for the header and footer of the page. It is helpful when you’re remarketing.
Next on the Setting menu is CSS code for web designers — if you want your page to have certain design elements.
Editing The Page
Underneath the Settings menu, you’ll find Backgrounds which allows you to change your page’s background to any image or color.
It doesn’t matter what background you’re using. But do ensure that the offer on the page is readable.
Further down below the Settings menu, you’ll find an option to change the Typography. If your brand has specific fonts and colors, you can implement them here.
Lastly, you’ll see the General Settings option in the Settings menu. It’s essential to set this up properly. We recommend that you “Hide” Affiliate Badge on this window. If you don’t turn off this little badge, you’re giving your prospects an extra exit, which decreases the probability of providing the details. We talked about this a few minutes ago — remember?
Rows And Elements
ClickFunnels has a powerful editor which comprises sections, rows, columns, and elements. Sections are like container box that contains rows and columns. Elements, such as text or buttons, go inside rows and columns.
Here’s a TRICK to identify them with colors:
- Light Teal: Section
- Blue: Rows and Columns
- Orange: Elements
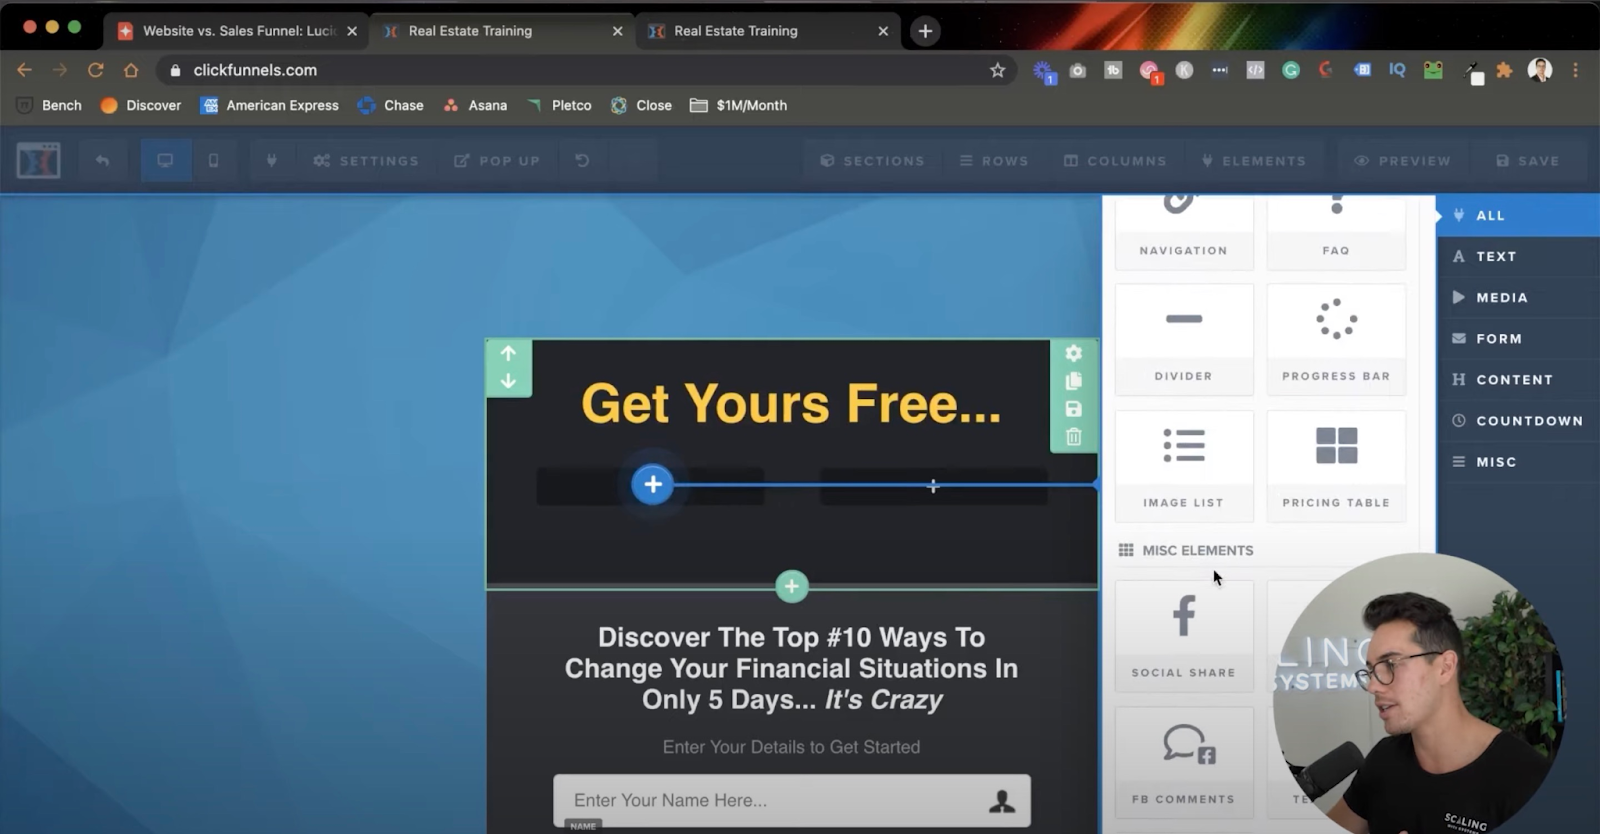
You can drag and drop rows, columns, sections, and elements from the top bar menu. Show your copywriting magic here and edit texts.
Additionally, clicking on them will open up different settings, allowing you to change looks and design aspects. It’s a playground, so feel free to experiment.
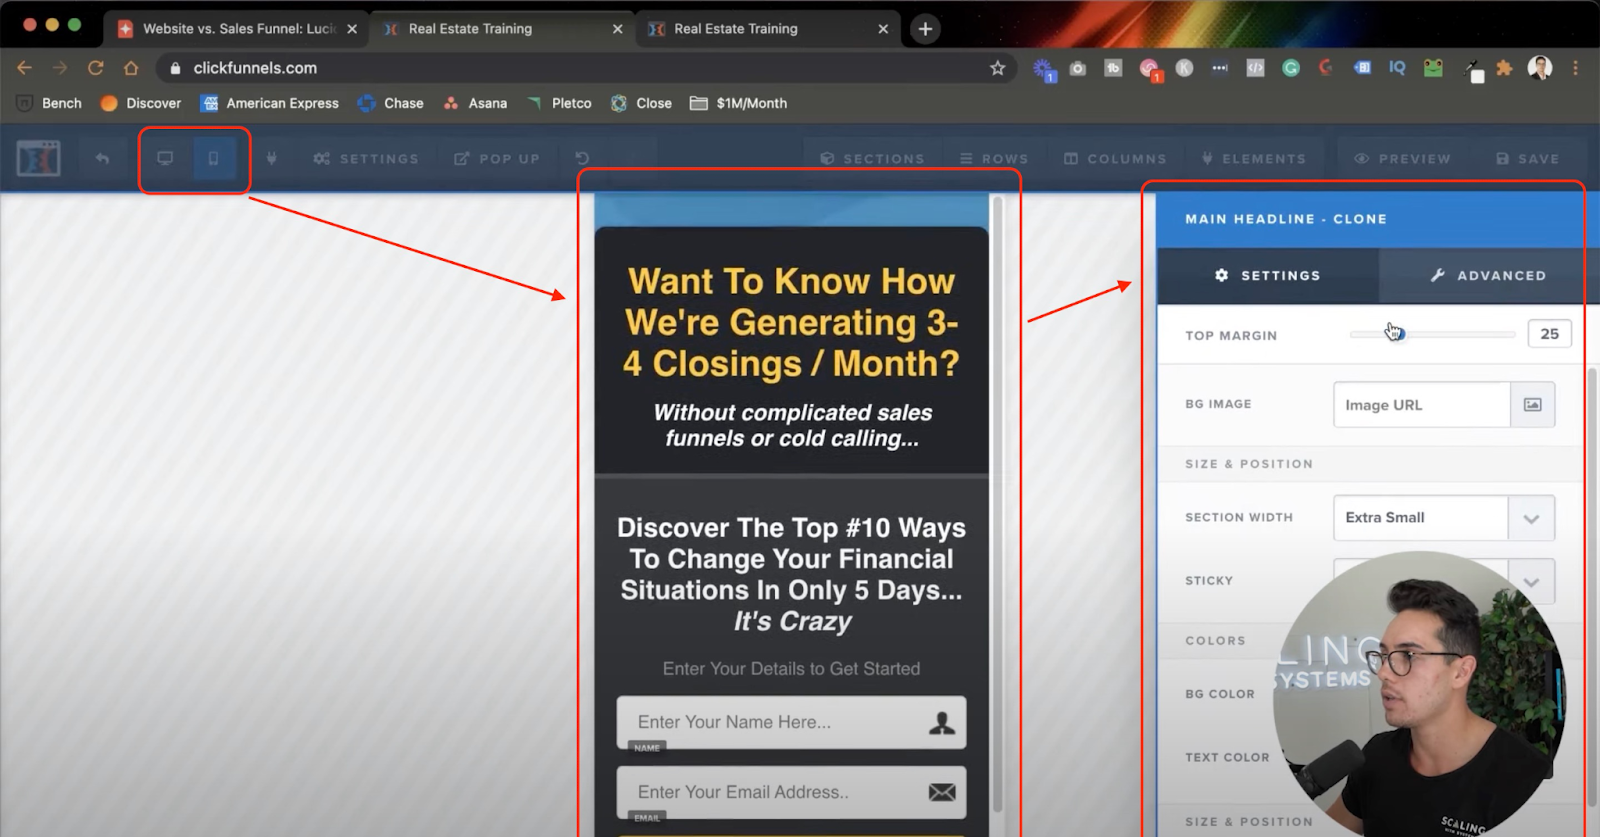
Important: Ensure your page appears good on desktop and mobile — both. Most of your traffic will come from mobile, and if the page doesn’t fit or load appropriately on the prospects’ devices, they may bounce back.
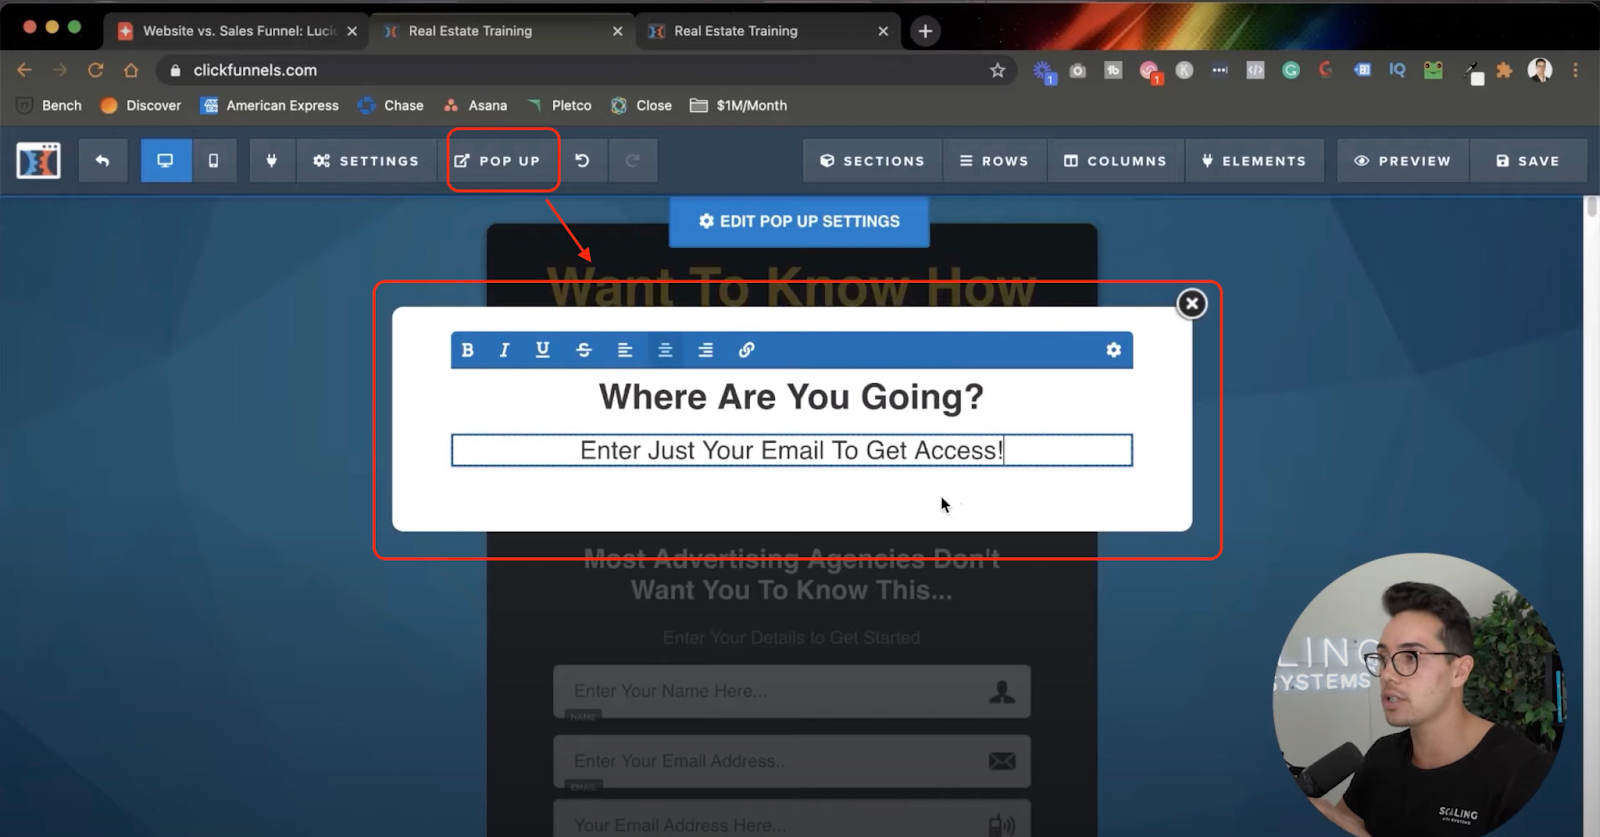
Adding Pop-up From Scratch
One of the best things you can do to reclaim a prospect’s attention is to add a sneaky pop-up.
Moreover, you can set the trigger on which the pop-up should appear. For instance, you could set up “on exit,” so when the user tries to exit the page, the pop-up will appear.
You could make this pop-up persuasive, offer something valuable that hooks the prospect, and make them take action.
Submit Button
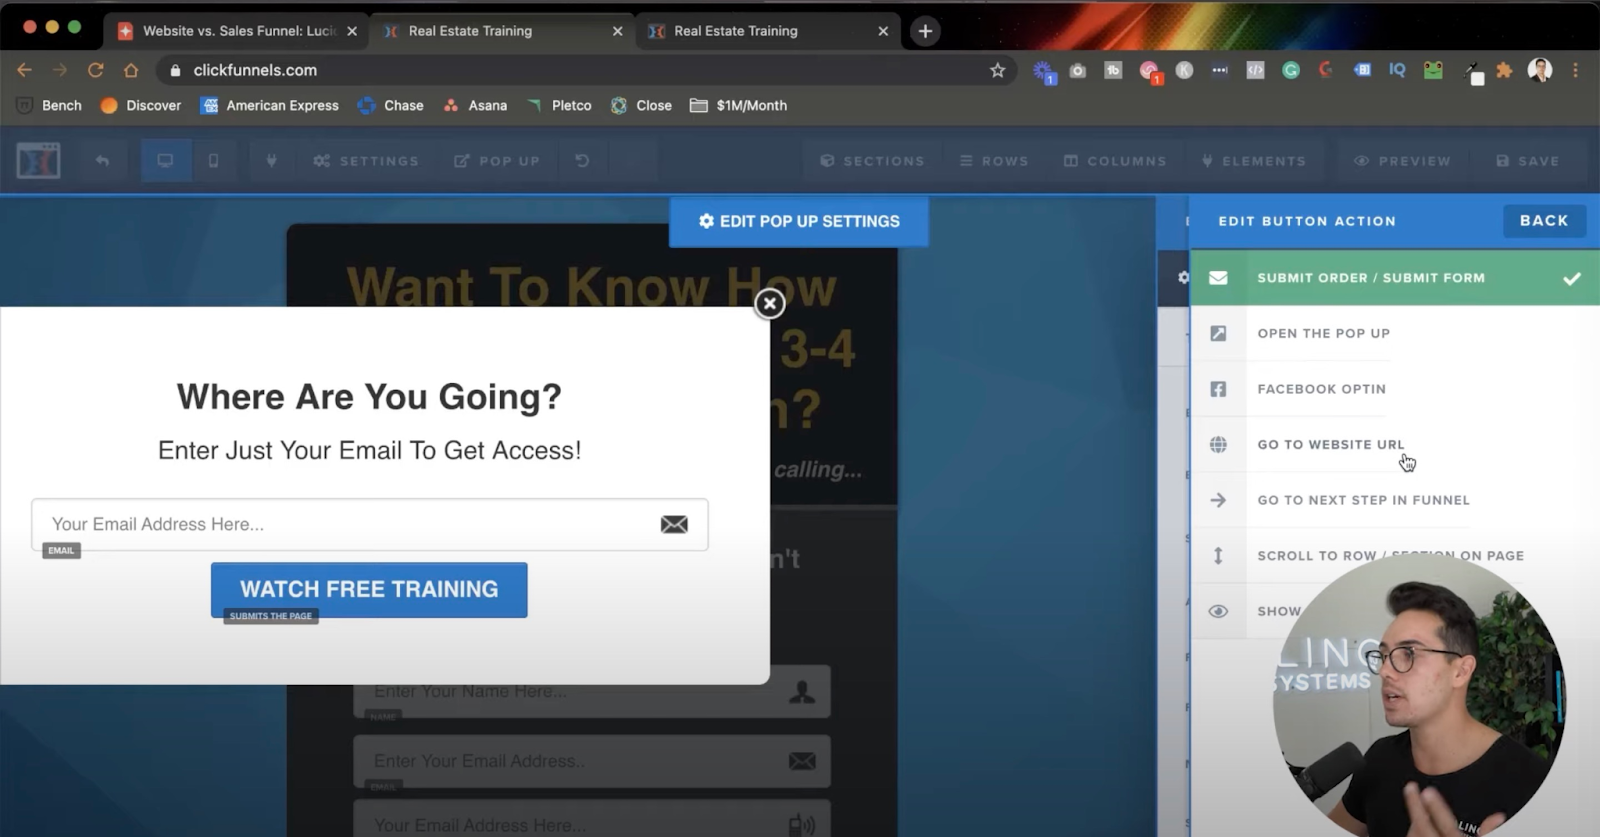
Another step you should be mindful of is configuring the Submit button. You can add this button on the pop-up beside the form on the opt-in page.
To add a button, hover over the pop-up and click + button. Find the button and drag and drop it onto the pop-up. Further, ensure you change the text to match your offer.
After setting the text, make sure “Edit Action” is set to “Submit Order / Submit Form” so that it sends the email to your CRM. However, there are several actions the button can trigger. See the image below:
Create A Thank You And Sales Page
We know that this has been an in-depth step-by-step ClickFunnels tutorial for beginners, so feel free to read over it a few times.
Now, there’s only one thing left to do.
So far, you’ve created a sales funnel and an opt-in page. But what happens when the prospect has opted in?
Two things can happen:
- Prospects go to the next step in the funnel.
- Prospects sent the Thank You page.
If you want an additional step in the funnel, you can click “+ Add New Step.” It’s helpful if you want your prospect to see a training video or redirect to a sales page.
If you want them to see a Thank You page (the last step in the funnel), ClickFunnels have hundreds of templates ready for you. You can also edit this page the same way you edited the opt-in page.
ClickFunnels Tutorial FAQ
What is a sales funnel?
A sales funnel is a commonly used marketing phrase that defines the journey a potential customer will take before making that final purchase. There will be many steps to a sales funnel, and they’re usually categorized as the top, middle, and bottom of the funnel. Using marketing and sales automation software, like ClickFunnels, is the best way to create a business sales funnel.
How much does it cost to join ClickFunnels?
You can start with a 14-day free trial, and then choose a paid plan option. With ClickFunnels pricing, the Basic plan starts at $127 a month. The pro plan, which gives you more funnels, admin users, students, contacts, and more, is $157 a month. The most comprehensive plan is the Funnel Hacker, which is $208 a month if you are billed annually.
Are ClickFunnels profitable?
They sure are! When you set them up right and have a great service or product, the potential profit you can get from using ClickFunnels is huge. As we shared, this tutorial came from our founder’s experience of winning an award from ClickFunnels for generating over one million dollars in revenue.
In a Nutshell: ClickFunnels Tutorial For Beginners
By now, you’ve learned about ClickFunnels features, how to create a high-converting sales funnel using the platform, and essential tips to make a winning sales funnel. This step-by-step ClickFunnels tutorial for beginners has now turned you into a pro, so it’s time to get started.
We know that creating a client acquisition strategy that works is important to you – that’s why you’re here reading this! If you feel ready to level up and find a profitable, predictable system for sales, that’s what we do! Book a free consultation call, and one of our team at Scaling With Systems will reach out to you to discuss how we can help.